How to Upload Image to Cloudinary Node.js

![]()
Image Upload to Cloudinary with Nodejs and Dotenv
Cloudinary helps developers across the world manage images with minimal efforts. In this tutorial, we will exist looking at how to upload images from our application to cloudinary.
This will be a continuation of the last tutorial on setting up a simple, secure and robust server.
Yous may want to bank check it out here or yous can go ahead and clone the repository. Follow the instructions on README.Doctor to setup the project on your local machine and then, allow's proceed on our mission to securely upload images to cloudinary.
Create a Cloudinary Account
- To create an account, go to the Cloudinary Website as you tin can see in the opening image.
- Click the
sign upwardlypush button on theacme right. - Fill the form that shows up accordingly.
- Submit the form using the
Create Accountbutton. - Check your email to finish upwards by validating your email
- Y'all should exist able to access your dashboard which looks like mine below:

Notice the Account details. It shouldn't be revealed to anyone. I am revealing this to you considering this is a temporary account used only for the purpose of this tutorial.
Checkout the Media Library tab too, this is where the uploaded images volition appear.
If y'all have all these showing, then let'southward stone and roll...
Install Cloudinary in Our Project
If you lot have not opened your last before, at present is the time to do so and navigate into the projection directory.
Execute the post-obit command to install Cloudinary
npm install cloudinary -- salvage
Setup Cloudinary in Our Project
- In the app.js file, require
cloudinarybelow theconst app = express();similar so:
const cloudinary = require ( ' cloudinary ' ). v2
- Next, add the configuration details from the business relationship details on your dashboard like so:
cloud_name : ' place your cloud_name here ' , api_key : ' identify your api_key hither ' , api_secret : ' place your api_secret here ' ,
This is what I accept:
// cloudinary configuration cloudinary . config ({ cloud_name : " dunksyqjj " , api_key : " 173989938887513 " , api_secret : " ZPLqvCzRu55MaM1rt-wxJCmkxqU " });
Create an API to Upload an Prototype
- To avoid bug in our code, First supersede the existing API with the post-obit code:
app . go ( " / " , ( request , response ) => { response . json ({ message : " Hey! This is your server response! " }); });
It is basically the same but this fourth dimension, nosotros are using become verb in place of the use verb and nosotros added a root end-bespeak (/).
- Next, simply before the
module.exports = app;line, nosotros will be creating ourimage-uploadAPI.
Allow's start by placing this lawmaking there
// image upload API app . post ( " /upload-image " , ( request , response ) => {});
Basically, this is how an API is setup. The API makes a Post request to the server telling the server that the request should be handled with a degree of security. It makes utilize of 2 parameters in making this asking - anstop-signal (/upload-image) and a callback function ((request, response) => {}).
Let's breathe life into the API by building out the callback function
Edifice the callback part
Install torso-parser
This npm package enables u.s.a. to handle incoming requests using req.trunk or request.body as the case may be. We will be installing trunk-parser using the following code:
npm install -- salvage trunk - parser
Configuring Body-Paser for Our Project
- Require torso-parse in our app.js like then
const bodyParser = require ( ' body-parser ' );
- Add the following code to set its
jsonfunction as global middleware for our app similar so:
app . utilise ( bodyParser . json ()); app . use ( bodyParser . urlencoded ({ extended : true }));
We tin can now handle our request trunk appropriately
Notwithstanding Building Our Function
- In the role, add the following lawmaking to collect any data (prototype) entered by a user
// collected image from a user const information = { image : request . body . image , };
- Next, upload the image to
cloudinaryusing the following code
cloudinary . uploader . upload ( data . prototype );
Basically, this is all nosotros need to upload our image. Then our app.js looks similar this :
const express = crave ( " limited " ); const app = limited (); const cloudinary = require ( " cloudinary " ). v2 ; const bodyParser = require ( ' trunk-parser ' ); // body parser configuration app . apply ( bodyParser . json ()); app . use ( bodyParser . urlencoded ({ extended : true })); // cloudinary configuration cloudinary . config ({ cloud_name : " dunksyqjj " , api_key : " 173989938887513 " , api_secret : " ZPLqvCzRu55MaM1rt-wxJCmkxqU " }); app . get ( " / " , ( request , response ) => { response . json ({ message : " Hey! This is your server response! " }); }); // image upload API app . post ( " /image-upload " , ( asking , response ) => { // collected image from a user const data = { image : request . body . paradigm , } // upload image here cloudinary . uploader . upload ( data . paradigm ); }); module . exports = app ;
Now this looks all expert and it works perfectly. Yous can test information technology out using postman. All the same, it is going to be awesome if our app can give usa feedback when it'due south done handling our asking. Correct?
To make this happen, we will add the following and then...catch... cake to the cloudinary upload like and so:
// upload image here cloudinary . uploader . upload ( data . image ) . and so (( consequence ) => { response . status ( 200 ). send ({ message : " success " , effect , }); }). catch (( error ) => { response . status ( 500 ). send ({ message : " failure " , mistake , }); });
So our final code will be:
const limited = require ( " express " ); const app = express (); const cloudinary = require ( " cloudinary " ). v2 ; const bodyParser = require ( ' trunk-parser ' ); // torso parser configuration app . apply ( bodyParser . json ()); app . use ( bodyParser . urlencoded ({ extended : true })); // cloudinary configuration cloudinary . config ({ cloud_name : " dunksyqjj " , api_key : " 173989938887513 " , api_secret : " ZPLqvCzRu55MaM1rt-wxJCmkxqU " }); app . get ( " / " , ( request , response ) => { response . json ({ message : " Hey! This is your server response! " }); }); // image upload API app . mail service ( " /image-upload " , ( request , response ) => { // nerveless image from a user const data = { image : asking . body . image , } // upload image hither cloudinary . uploader . upload ( data . paradigm ) . then (( result ) => { response . status ( 200 ). send ({ bulletin : " success " , event , }); }). grab (( error ) => { response . status ( 500 ). send ({ message : " failure " , mistake , }); }); }); module . exports = app ;
Testing our API
- Create a binder/directory in the root directory name it
imageslike so:
mkdir images
-
Copy an epitome of your choice to this folder. (Now, the path to your image relative to the app.js file should wait like this:
"images/<your-image.jpg">) -
At present permit's go on to
postman- In the address bar enter this:
http://localhost:3000/image-upload - Set the
HeaderKey toContent-Typeand value toapplication/json - Set the
trunkto thejsondata we declared in our lawmaking like so:
- In the address bar enter this:
{ " image " : " images/oskar-yildiz-gy08FXeM2L4-unsplash.jpg " }
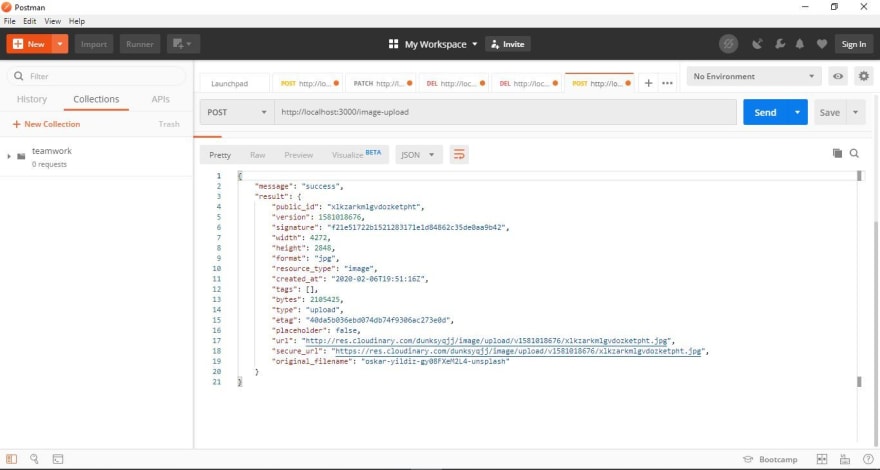
Hit the Send button and wait for upload to complete and get your response

At present, this is the consequence. The image now has a unique public_id which is randomly generated by Cloudinary and a secure_url which is globally accessible (you can load it in your browser to encounter)
Finally, checking the Media Library tab on your Cloudinary dashboard, yous should have a new prototype with a new badge on it which has a unique id that matches the public_id nosotros saw in the postman result above just like in the image beneath

Walah!!! We are persisting prototype without stress... That feels good...
Well, i more than thing - SECURITY!
Our Cloudinary configuration details is exposed in our app.js file. If we push button our project to github, information technology becomes publicly available to anyone who cares to check and that becomes a problem if information technology gets into the incorrect hand.
Simply don't worry nearly a thing here, in that location is a fix for almost everything in this space. Nosotros will be using the dotenv npm package to hid our configurations from the public.
Secure our Configurations
- Install Dotenv
npm install dotenv -- save
- Crave
dotenvinapp.jslike and so
crave ( ' dotenv ' ). config ()
-
Create a new file in the root directory and name it
.env -
In the file, enter your Cloudinary configuration details like and then:
CLOUD_NAME = dunksyqjj API_KEY = 173989938887513 API_SECRET = ZPLqvCzRu55MaM1rt - wxJCmkxqU
- In the app.js file, nosotros will access the configurations in the
.envfile viaprocess.envproperty like so:
// cloudinary configuration cloudinary . config ({ cloud_name : process . env . CLOUD_NAME , api_key : procedure . env . API_KEY , api_secret : process . env . API_SECRET });
This is my app.js code at this moment
const express = require ( " express " ); const app = express (); const cloudinary = crave ( " cloudinary " ). v2 ; const bodyParser = require ( ' body-parser ' ); require ( ' dotenv ' ). config () // body parser configuration app . use ( bodyParser . json ()); app . use ( bodyParser . urlencoded ({ extended : truthful })); // cloudinary configuration cloudinary . config ({ cloud_name : process . env . CLOUD_NAME , api_key : process . env . API_KEY , api_secret : process . env . API_SECRET }); app . get ( " / " , ( request , response , next ) => { response . json ({ message : " Hey! This is your server response! " }); side by side (); }); // image upload API app . mail ( " /image-upload " , ( request , response ) => { // collected image from a user const data = { paradigm : request . trunk . epitome , } // upload image hither cloudinary . uploader . upload ( data . prototype ) . then (( issue ) => { response . status ( 200 ). transport ({ message : " success " , event , }); }). catch (( mistake ) => { response . status ( 500 ). ship ({ bulletin : " failure " , mistake , }); }); }); module . exports = app ;
Let's test our app again to ensure nothing is broken. Here is my consequence:

I now take 2 of the same epitome but with different public_id
And that is information technology!
Yeeeh!!! Our application is more secure than it was at the onset.
Conclusion
This tutorial was able to accept us through the steps involved in uploading an image to cloudinary through a nodejs awarding.
In the end, nosotros ensure our configuration details is secure by using the dotenv npm package
All codes are available hither
Now, later on uploading our images to cloudinary through nodejs, it is near useless if nosotros can not retrieve or use them. For this reason, nosotros will be looking at Persisting and Retrieving images using cloudinary and Postgresql Through Nodejs.
If you have questions, comments or suggestions, please drib them in the comment department.
You can also follow and bulletin me on social media platforms.
Twitter | LinkedIn | Github
Cheers For Your Fourth dimension.
Source: https://dev.to/ebereplenty/image-upload-to-cloudinary-with-nodejs-and-dotenv-4fen
Post a Comment for "How to Upload Image to Cloudinary Node.js"